Swipe left or right to navigate to next or previous post
Comprehensive tutorial on hosting the static site in AWS using S3, cloudfront, Certificate Manager and Route53 - part 1
09 Apr 2024
. category:
AWS
.
Comments
#AWS
#AWS S3
#AWS CloudFront
#AWS Route53
#AWS Certificate Manager

Major Steps for hosting the static sites:
- Step 1: Create a bucket
- Step 2: Edit Block Public Access settings
- Step 3: Enable static website hosting
- Step 4: Add a bucket policy that makes your bucket content publicly available
- Step 5: Configure an index document
- Step 6: Configure an index document
- Step 7: Test your website endpoint
- Step 8: Creating an SSL/TLS Certificate for CloudFront
- Step 9: Configuring CloudFront Distributions for Website Delivery
- Step 10. Configuring Route53 for DNS Management
- Step 11: Clean up
In this tutorial, we will learn and explore about creating the S3 bucket, updating the block settings, enabling the static website uploading index and error document. The further steps to create SSL/TLS certificate, cloudfront distribution and Route53 will be explored in next tutorial.
Step 1: Create a bucket
In this step, we will create the bucket that contains all the static files for the website. If you have already created the bucket. you can skip to step 2.
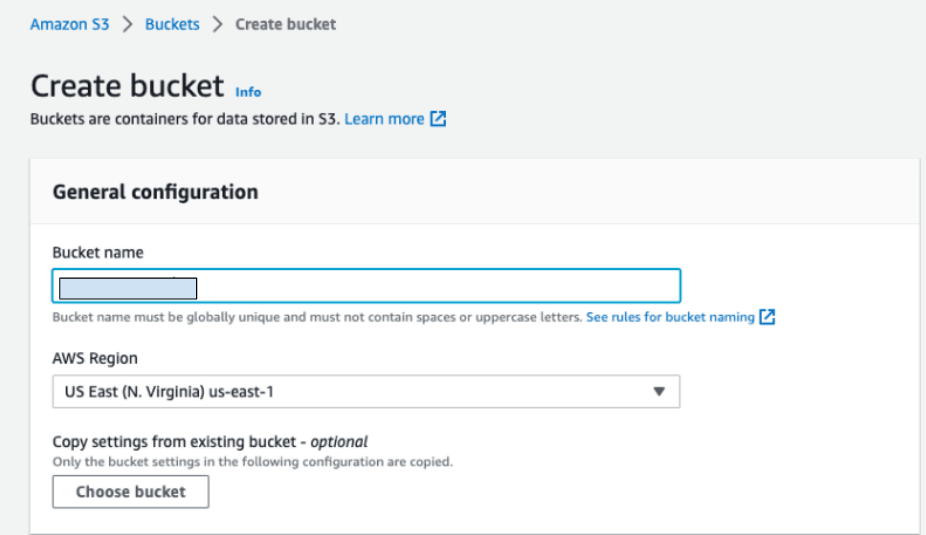
Steps to create the bucket:
- Sign in to the AWS Management Console and open the Amazon S3 console at https://console.aws.amazon.com/s3/.
- Choose Create bucket button.
- Enter the Bucket name. The name must be unique. You can enter you site name like tapanbk.com.np just to identify website
- Choose the Region where you want to create the bucket. Always Choose the region that is geographically close to minimize the latency and costs accrued due to latency. The region also determines the final endpoint of Amazon S3 website endpoint.
- And the click Create.
Step 2: Edit Block Public Access settings
In this step, we will explore on how to update the block public access settings for the website. By default, Amazon s3 blocks public access to the buckets. So, to host a static site, you need to edit block public access settings.
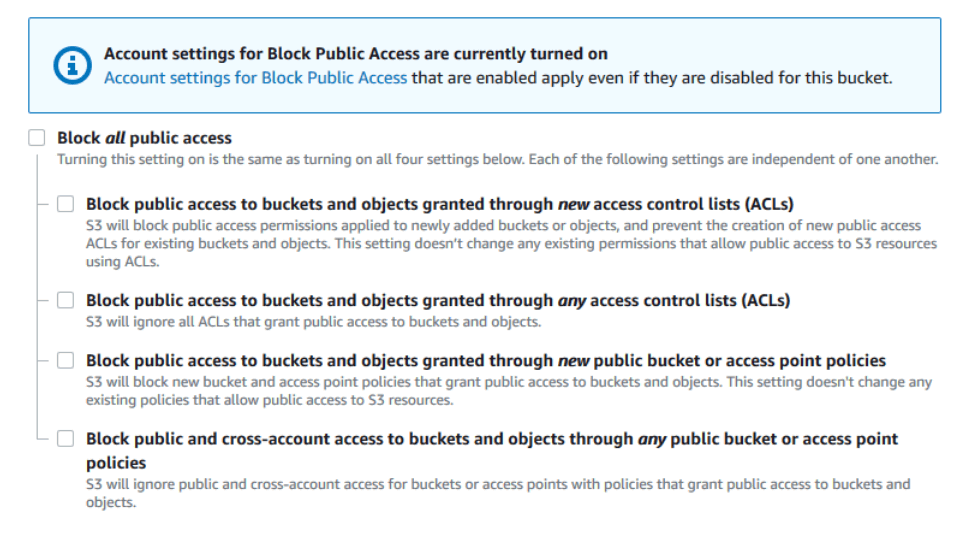
Steps to enable the public access settings.
- Open the Amazon S3 console at https://console.aws.amazon.com/s3/.
- Choose the bucket that you have configured as a static website.
- Choose Permissions Tab.
- Under Block public access (bucket settings), choose Edit.
- Clear Block all public access, and choose Save changes.
Step 3: Enable static website hosting
In this step, We will explore on how to enable static website hosting from the Amazon S3 bucket. After you create a bucket, you can enable static website hosting for the bucket.
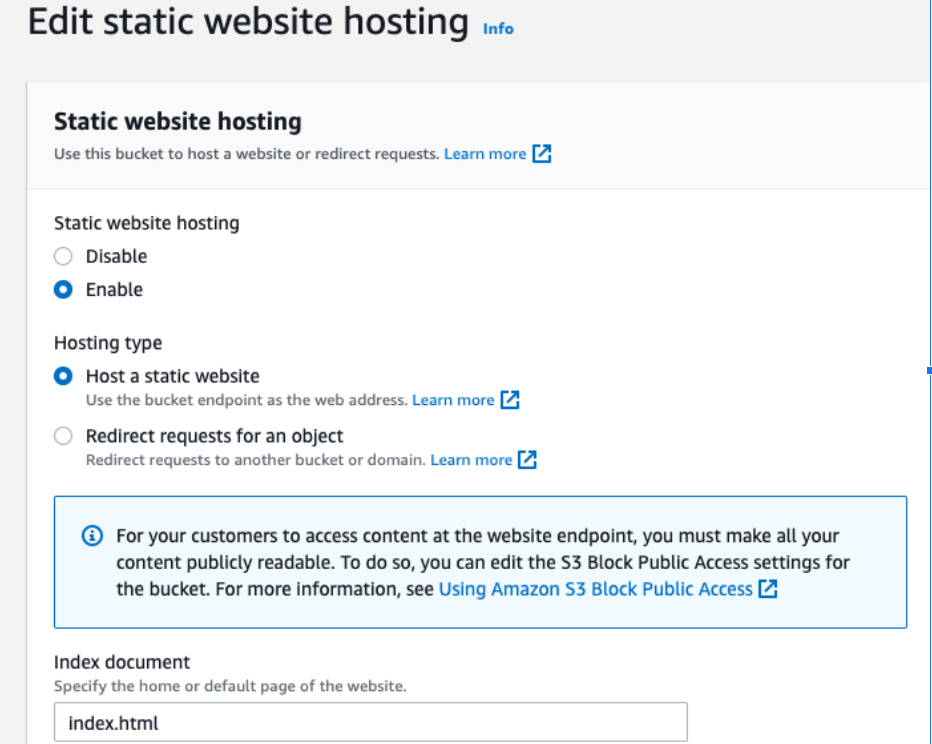
Steps to enable static website hosting.
- Sign in to the AWS Management Console and open the Amazon S3 console at https://console.aws.amazon.com/s3/
- You can see te list of bucket. Choose the name of the bucket that you want to enable static website hosting.
- Choose Properties tab.
- Scroll upto the Static website hosting section, choose Edit.
- Choose Use this bucket to host a website.
- Under Static website hosting, choose Enable.
- In the Index document, enter the filename of the index document. Typically, the Index document is index.html. The index document is case-sensitive and name and extension must match the file name of the index document. The index document is returned when requests for a root domain is made.
- To provide your custom error document for 4XX class errors, in the Error document, enter the custom error document file name. The error document name is case-sensitive, and it must exactly match the file name of the HTML error document. AWS S3 will return a default HTML error document. if no custom error document is mentioned.
- (Optional) You can specify the advanced redirection rules in JSON format to describe redirection rules under Redirection rules if you want to specify redirection.
- Choose Save Changes.
Amazon S3 will enable the static website hosting for the bucket. The endpoint of the static website hosting will be provided at the end of the bucket.
- Note the endpoint under static website hosting. This is the Amazon S3 website endpoint.
After you enable the static website, you can enter this endpoint in the browser to test the website. But first you need to update the index and error file. The endpoint will be similar to http://bucket-name.s3-website-region.amazonaws.com
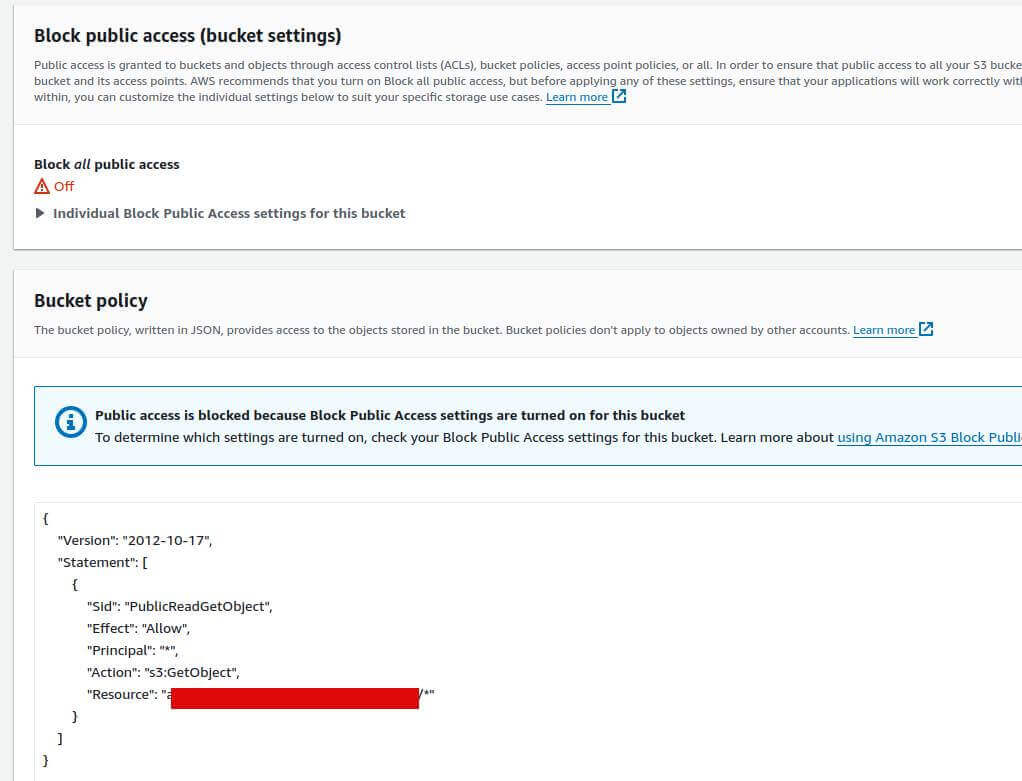
Step 4: Add a bucket policy that makes your bucket content publicly available
It is required to update the S3 bucket policy to grant public read access to the bucket after editing S3 Block Public Access settings. After granting public read access, anyone on the internet can read access the bucket.
Steps to update bucket policy of the bucket
- Under Buckets, choose the name of your bucket.
- Choose Permissions.
- Under Bucket Policy, choose Edit.
-
To grant public read access to your website, copy the following bucket policy, and paste it in the Bucket policy editor.
{
   "Version": "2012-10-17",
    "Statement": [
        {
            "Sid": "PublicReadGetObject",
            "Effect": "Allow",
            "Principal": "*",
            "Action": [
                "s3:GetObject"
            ],
            "Resource": [
                "arn:aws:s3:::Bucket-Name/*"
            ]
        }
    ]
}
Replace the Bucket-Name with your actual Bucket Name
- Update the Bucket-Name with your actual bucket name. In the above example, Bucket-Name is a placeholder for the bucket name. To use the policy, update the Bucket-Name place holder with actual Bucket name.
- Choose Save Changes.
There will be a message indicating that the bucket policy has been updated successfully.
If there is an error indicating invalid resource, confirm the bucket name with the bucket name in the placeholder.
Step 5: Configure an index document
While enabling the static website hosting, you need to enter the index document like index.html. After you enabled the static website, you need to create the index document and upload that index document in the bucket.
Steps to configure the index document
- Create the index document, in our case index.html.
- Save the index.html file locally.
- Sign in to the AWS Management Console and open the Amazon S3 console at https://console.aws.amazon.com/s3/
- In the bucket list, choose the bucket that will be used for static website
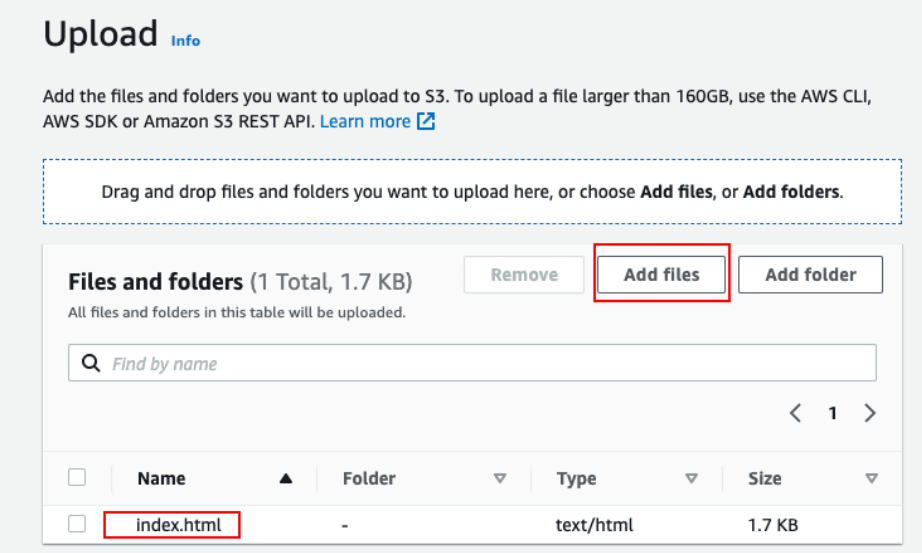
- To upload the index document in the bucket, do on of the following:
- Drag and drop the index file into the console bucket listing.
- Choose Upload, and follow the prompts to choose and upload the index file.
- (Optional) Upload related images, js, css or html files
While enabling the static website hosting, you need to enter the error document like index.html. After you enabled the static website, you need to create the error document and upload that error document in the bucket.
Steps to configure the error document
- Create the error document, in our case error.html.
- Save the error.html file locally.
- Sign in to the AWS Management Console and open the Amazon S3 console at https://console.aws.amazon.com/s3/
- In the bucket list, choose the bucket that will be used for static website
- To upload the error document in the bucket, do on of the following:
- Drag and drop the error file into the console bucket listing.
- Choose Upload, and follow the prompts to choose and upload the error file.
- (Optional) Upload related images, js, css or html files
Step 7: Test your website endpoint
After you configured and completed all of the above steps, you can finally test the website endpoint.
Steps to find the website endpoint
- Sign in to the AWS Management Console and open the Amazon S3 console at https://console.aws.amazon.com/s3/
- In the bucket list, choose the bucket that will be used for static website
- Choose Properties
- At the bottom of the page, Under Static website hosting, you will see the static website endpoint. The endpoint will be similar to http://bucket-name.s3-website-region.amazonaws.com.
- Copy the endpoint of the website.
- Open the browser of your choice and paste the copied website endpoint. You must see the index page of the website
Final Notes
You might have a domain like tapanbk.com.np and you may want to configure your the aws static website to use the domain name of the choice.
Explore more about this in part 2, Please visit Comprehensive tutorial on hosting the static site in AWS using S3, cloudfront, Certificate Manager and Route53 - part 2

Tapan B.K. is Full Stack Software Engineer. In his spare time, Tapan likes to watch movies, visit new places.